


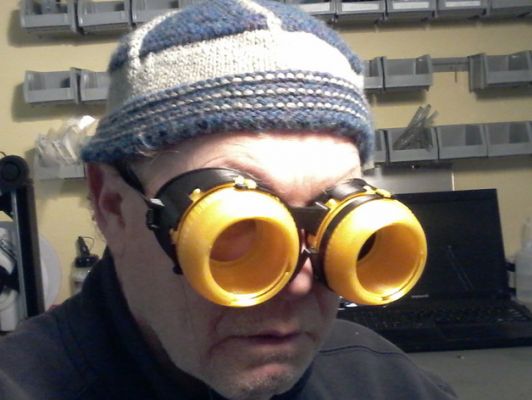


Right and left "eyeballs" snap into the goggles and a 3D printed spring holds them open. A discrete piece of fishing line is used to actuate the blink. Or you can also skip the spring and the fishing line and just reach up and operate each iris manually. Optionally, you can add "lenses" to enhance the look.
Post-PrintingIn addition to the 3D printed parts, you will need about 12" of 3/8" wide (or 10mm) elastic, and about 36" (1m) of fishing line. After printing the eyeballs, you will have to cut way the small tabs that hold the bottom of each iris leaf in place. Then insert a small flat bladed screwdriver between the outer sphere and the studded ring to break away the outer sphere from the base. When everything is freed up, rotating the outer sphere relative to the base ring will open and close the iris. Run the eyeballs open and closed many times until they operated freely. Add a drop of light oil to the leafs so that they operate very smoothly.The right and the left irises operate in different directions. When mounted in the goggles with the irises open and the little actuator tabs at the top, they should open when the tab is moved to the outside of the goggles. Snap each eyeball in place accordingly. Be very gentle because the little fingers on the goggles can break if overflexed. (You can glue them back in place if one or two break.)Next, insert the spring into the tabs as shown in the photos. The irises should want to spring open. If they want to close, swap the eyeballs. Tie one end of your fishing line thru the hole in the right side of the spring, thread it down thru the eyelet in the right side of the goggles and back up thru the eyelet in the left side of the goggles. Finally tie it off to the left side of the spring. Lastly, thread your elastic through the slots in the side of the goggles.Put on the goggles. Loop your thumb through the big loop of fishing line and pull downward to blink. Both sides must be pulled at the same time or else the spring will jam.Optional Lenses: Cut out two 1.75" diameter discs from tinted acrylic sheet (3mm thick or thinner is ideal). Cut flats on each side so that the distance across the flats is 1.525". Slide each disc into the front opening, center and press up against the iris-side of the inner sphere and carefully super glue into place.
| Price | $1.50 |
| Category | Toys |
| Purchases | 0 |
| Views | 2959 |
| Likes | 0 |
| Uploaded | 06/26/2017 |
This work is licensed under the Redpah License.
| eyeball4_goggle.STL | 5 MB |
| eyeball4_goggle_mirror.STL | 5 MB |
| goggles.STL | 2 MB |
| spring.STL | 88 KB |
No comments yet!
Please login or register to write a comment.